Help Desk
Be sure to include your account id!
|
 | | Setting up Targeted Email Notifications | | This feature allows you to create highly customized the email for many types of appointment events including confirmations, cancellations, follow-ups, no-shows and reminders. You create email templates that provides the details for a type of email including who receives it, when it is sent, and what details are included in the email.
You may also set account wide email defaults for Copy To and Fail To. The defaults described below are optional. When specified they apply to all emails sent through your Flash Appointments account unless they are specifically overridden per email template.
To get started you first need to enable Targeted Email Notifications on your scheduler. From the Welcome Screen choose Update Subscription and check the Targeted Email Notifications box. There is a small charge for this service.
Once you have enabled Targeted Email Notifications on your account, this feature is accessed from the Welcome Screen option labeled Targeted Notifications.
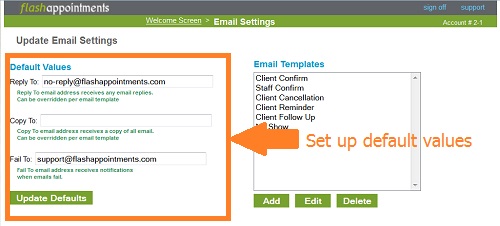
1. Set up Default Values (optional)
Reply To: Specify an email address here if you want to receive replies from email recipients when they reply to emails sent through your Flash Appointments account. IMPORTANT: We no longer recommend using this setting as email servers can interpret this as spoofing and flag the email as suspicious.
Copy To: Specify an email address here if you want to receive a copy of all emails sent through your Flash Appointments Account.
Fail To: Specify an email address here if you want to receive notifications of email failures.
2. Create Email Templates
Consider the ways you want to communicate via email based on appointment events:
Confirmation – Email sent when a new appointment is scheduled.
Cancellation – Email sent when an appointment is cancelled.
Reminder – Email sent some specified time before the appointment is scheduled.
Follow Up - Email sent some specified amount of time after the appointment when it has been marked as "Show".
No Show - Email sent some specified amount of time after the appointment when it has been marked as "No Show".
The following steps show how to create a client reminder email:
• Below the Email Templates list click the Add button to add a new template • The Email Template Settings window is displayed
• Enter a Label for the template like “Client Reminder”. Be specific!
• Select the Reminder option under Type
• Specify the amount of time before an appointment that you want the reminder sent(Example to send 30 hours before, specify 1 day + 6 hours)
• If you would like the email to be sent only for certain services, check those services in the Service Filter box. Otherwise, it goes out for all types of service.
(Click to enlarge)

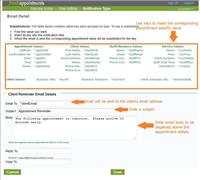
• Click the Next button (The Email Detail window is displayed)
• In the "Email To" field, copy and paste the key for the client email: ^clientEmail
(Refer to the key table to insert an appointment specific value in any field)
• Enter a Subject for the email. Make the subject something specific so that it does not look like junk in the users email folder. Example, “Don’t forget your ^svcName appointment with ^staffName tomorrow!”
• Enter a Body for the email to be displayed above the appointment details.
• Enter a Reply To email address if you want to override the Default Reply To for this template.
• Enter a Copy To email address if you want to override the Default Copy To, example ^staffEmail will send a copy to the staff person.
• Click the Save button to save the template.
(Click to enlarge)
| | | Back to Search Results |
|